Back to blog
How to Create a Prompt Gallery Using Midjourney, ChatGPT, and Pinata
Unsure how to harness the power of AI tools like Midjourney and ChatGPT? You’re not alone. This blog will guide you in leveraging these technologies effectively, helping you keep pace with the rapidly advancing AI field.
We’ll focus on creating a Prompt Gallery using Midjourney, ChatGPT, and Pinata — a project blending AI, creativity, and personal expression. Midjourney generates the images, ChatGPT builds our webpage, and Pinata hosts it, making our creations easily accessible to the world. By the end, you’ll have something similar to this:
Beyond a fun project, this venture imparts valuable AI skills, encourages creativity, and serves as a stepping stone into AI’s vast potential.
Project Inspiration
Twitter and Instagram are great to share your latest Midjourney images and prompts but I wanted to create a unique environment for mine to share. Inspired by museums, I wanted the webpage to feature a minimalistic white background to put focus on the images with simple museum-like labels to share the prompts.
As for the series itself, it’s titled Limelight Lasso. I’ve always been a fan of cowboy hats and wanted to create a series dedicated to them. Drawing inspiration from Drake’s Hotline Bling video, I wanted to create a unique and colorful environment for each cowboy hat. Hopefully you enjoy!
With that, let’s jump in!
Using Midjourney to Generate Images
Midjourney is an exceptional platform that allows you to generate creative and unique images. If you’re new to using Midjourney for generating images, check out this extensive tutorial which explains how to use the Midjourney Discord to prompt images. If you have at least made it to the Midjourney Discord and have prompted an image already, this tutorial will get you through.
For our images in this tutorial, I prompted Midjourney with:

Whatever images you end up selecting, you’ll want to upscale them before downloading. To upscale an image, simply select U1, U2, U3 or U4 of the images you want upscaled.
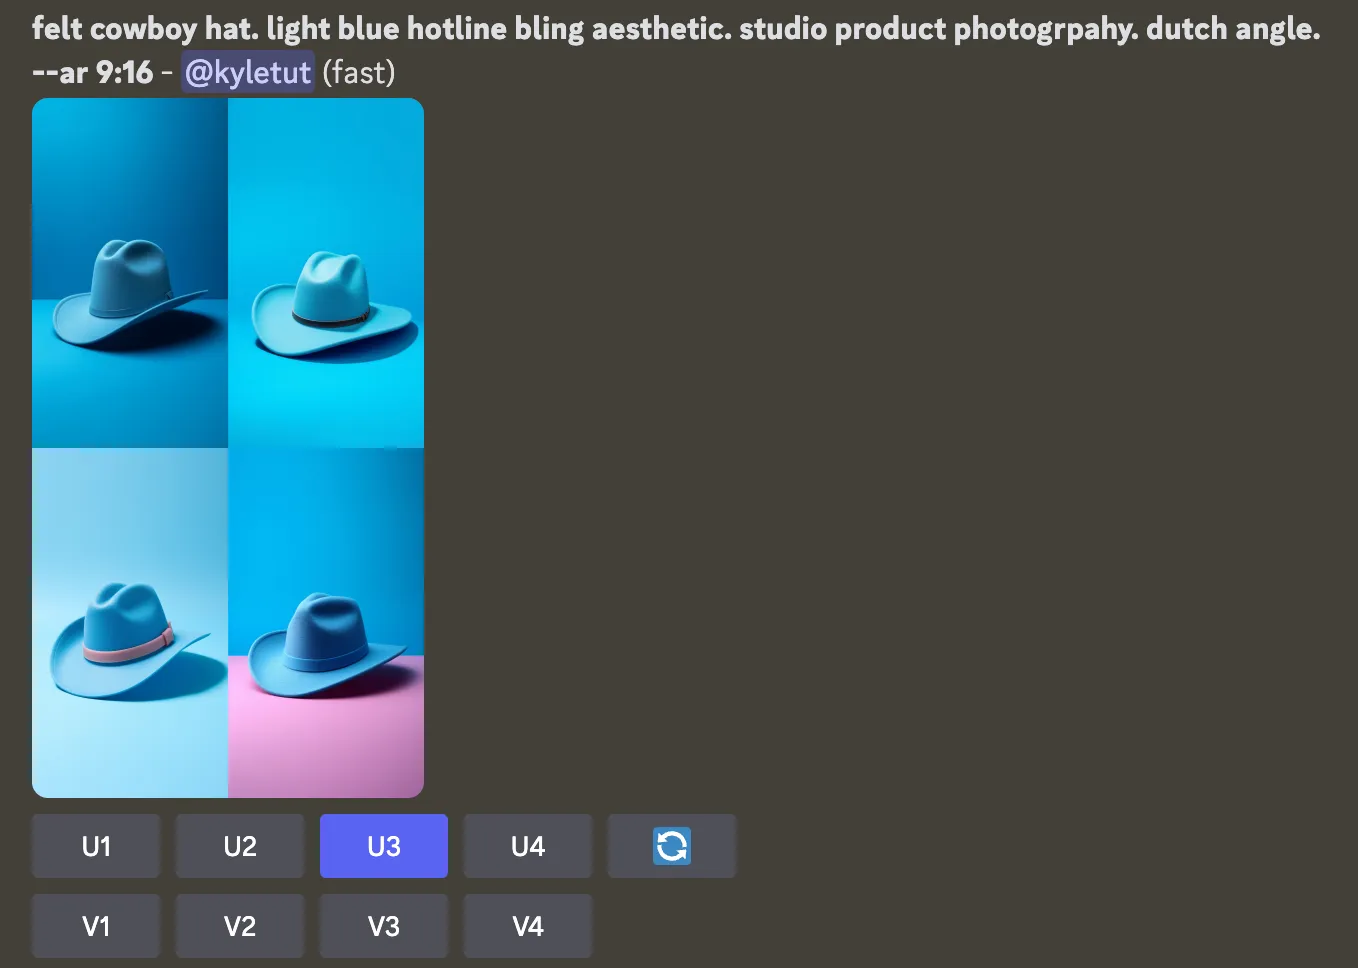
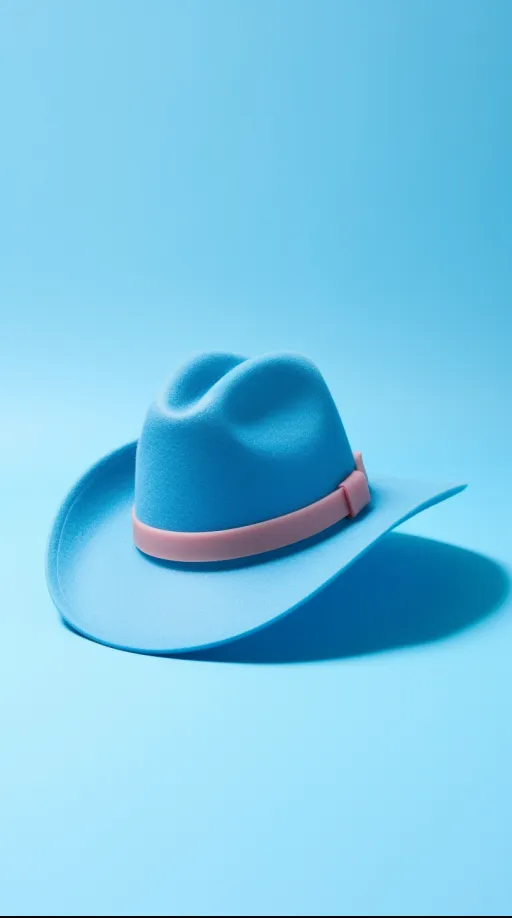
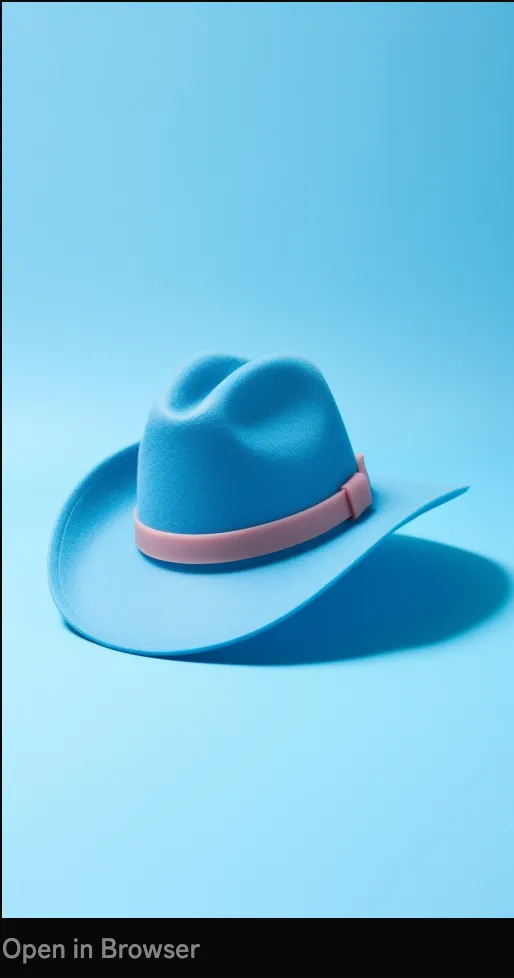
The result of upscaling:
Next, you’ll want to download the images from Discord to your device. To do so, click on the image and click Open in Browser in the bottom left.
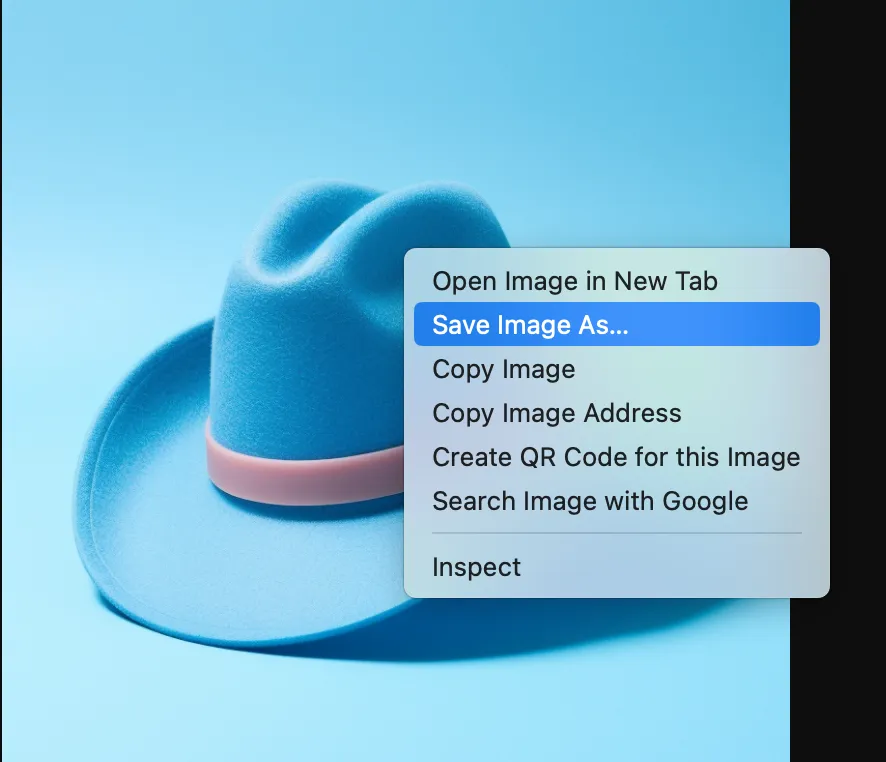
Once the images have been open in browser, right click Save Image As… to your device.
Once downloaded, you will want to upload them to Pinata to generate links to the images. You could use the links from Discord before you downloaded them to your device. However, this leaves the life of the image at the whims of Discord’s and Midjourney’s retention policies. To prevent dead links, upload to Pinata or another provider.
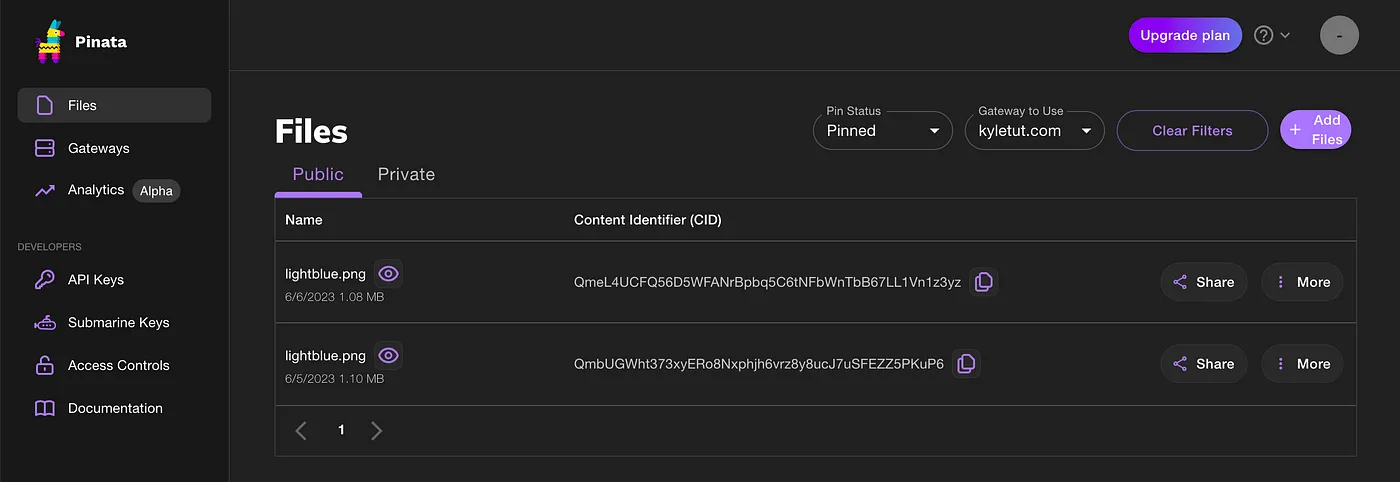
To upload to Pinata, go to https://pinata.cloud and create an account if you don’t have one. Once created, click Add Files in the upper right to upload your images. Upload them as single files.
Once uploaded, to open and grab the URLs of the images, simply click on the file name or the eye next to the file name.
Here is one of those links hosted through my personal Pinata dedicated gateway with custom domain:
https://kyletut.com/ipfs/QmeL4UCFQ56D5WFANrBpbq5C6tNFbWnTbB67LL1Vn1z3yz
We will be using these image URL links in our prompt of ChatGPT in the next section.
Using ChatGPT to Generate Code
With your images ready, it’s time to create your AI-generated Instagram app. For this, we’ll use OpenAI’s ChatGPT to generate the necessary HTML, CSS, and JavaScript code. Here are the steps:
Visit the OpenAI website and sign up for an account if you haven’t already. Navigate to the ChatGPT section. I used ChatGPT-4 for this tutorial.
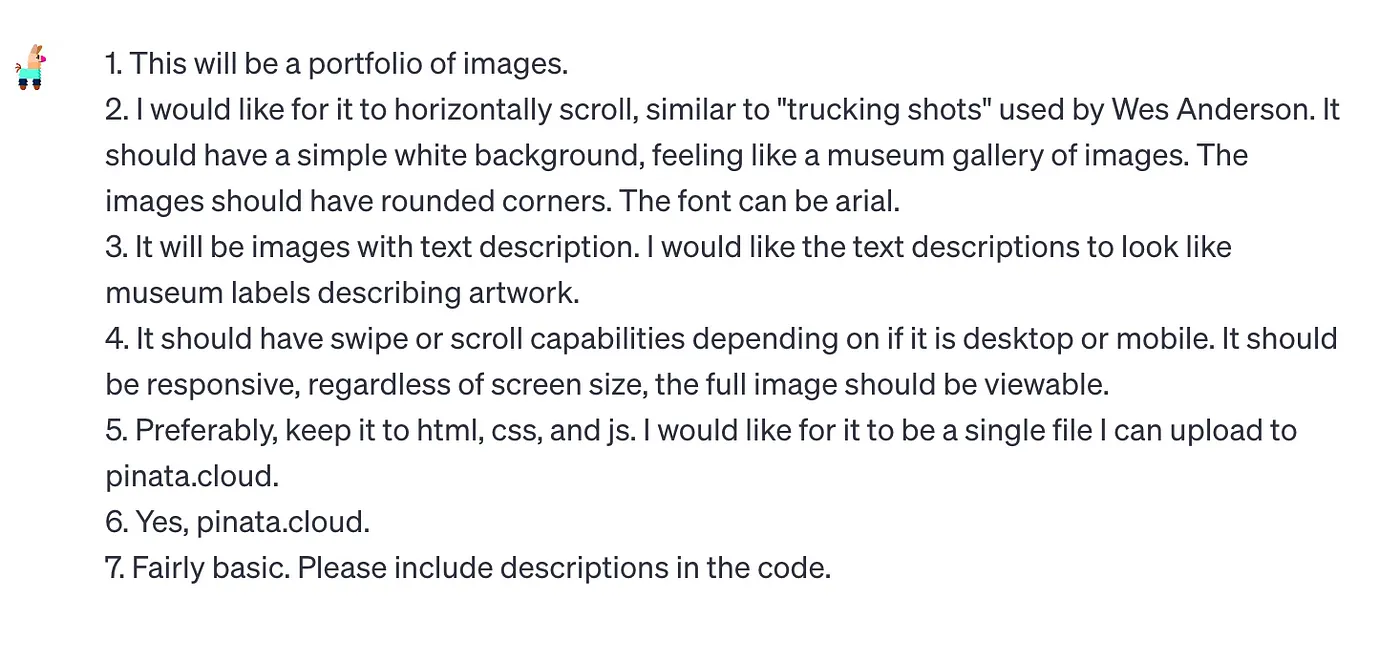
Begin a conversation with ChatGPT, providing it with detailed instructions on what you want. For our example, I prompted in the following way:

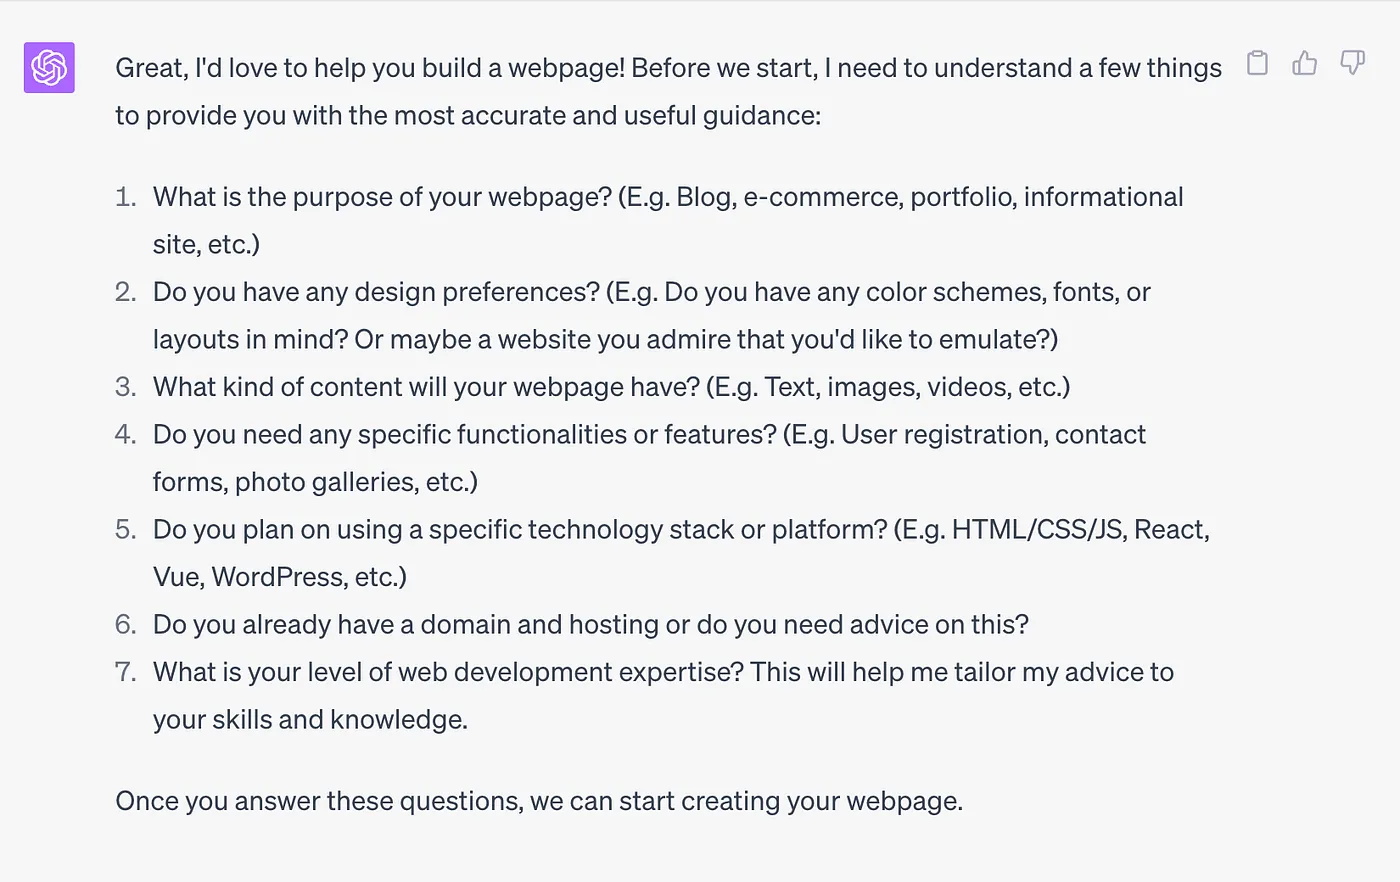
ChatGPT responded with the following:
My answers:
This will result in an output of code by ChatGPT like the following:
Excellent! With those specifications in mind, we can create a simple, responsive portfolio webpage using HTML, CSS, and JavaScript. Let’s start by breaking down the task into smaller pieces:
- HTML for content structure
- CSS for design and styling
- JavaScript for interactivity and responsiveness
I’ll guide you step by step. Remember, the comments inside the <!-- --> for HTML and /* */ for CSS and JS are my descriptions.
Step 1: HTML Structure
We’ll first define the HTML structure of our webpage. In this case, a series of span containers, each containing an img tag for the image and a p tag for the description.
<!DOCTYPE html>
<html>
<head>
    <title>Image Portfolio</title>

</head>
<body>
    <div class="gallery">

        <div class="artwork">
            <img src="" alt="description of image1">
            <p class="label">Image 1 description goes here</p>
        </div>
        <div class="artwork">
            <img src="" alt="description of image2">
            <p class="label">Image 2 description goes here</p>
        </div>

    </div>
</body>
</html>
Step 2: CSS Styling
Next, we’ll add the CSS to provide the style you described. This will be within a <style> tag in the <head> of the document. We're setting up the gallery as a horizontal scroller, with each image and its label inside a container. The images will have rounded corners.
<head>
    <title>Image Portfolio</title>
    <style>
        /* We'll start with some resets and base styles */
        * {
            box-sizing: border-box;
        }
        body {
            font-family: Arial, sans-serif;
            margin: 0;
            padding: 0;
            background-color: white;
        }
        .gallery {
            display: flex; /* Makes the gallery a horizontal scroller */
            overflow-x: auto; /* Allows scrolling when content exceeds the container width */
            white-space: nowrap; /* Prevents the images from wrapping to the next line */
            padding: 50px; /* Adds some space around the gallery */
        }
        .artwork {
            flex: 0 0 auto; /* Prevents the images from shrinking */
            margin-right: 50px; /* Adds some space between each artwork */
        }
        .artwork img {
            display: block; /* Helps with removing the bottom space under the image */
            max-width: 100%; /* Makes the image responsive */
            height: auto; /* Keeps the aspect ratio of the image */
            border-radius: 20px; /* Rounded corners */
        }
        .label {
            margin-top: 10px; /* Adds some space between the image and the label */
            text-align: center; /* Centers the text */
        }
    </style>

</head>
Step 3: JavaScript for Responsiveness and Interactivity
Lastly, let’s add some JavaScript to handle swipe/scroll events for touch devices. We will add this script inside a <script> tag in the <head> section.
<head>
    <title>Image Portfolio</title>
    <style>
        /* Styles here */
    </style>
    <script>
        /* When the DOM is fully loaded, the script will start */
        document.addEventListener('DOMContentLoaded', function() {
            var startX; /* This variable will hold the start x position of the swipe */
            var scrollLeft; /* This will hold the start scroll position */
            var gallery = document.querySelector('.gallery'); /* We select our gallery */

            /* Event listeners for the mouse events for desktop */
            gallery.addEventListener('mousedown', function(e) {
                /* The event (e) gives us position data, among other things */
                startX = e.pageX; /* We get the x position when the mouse is pressed */
                scrollLeft = gallery.scrollLeft; /* And the start scroll position */
                gallery.classList.add('active'); /* We add a class so we can change the cursor */
            });
            gallery.addEventListener('mousemove', function(e) {
                if(!startX) return; /* If mousedown didn't fire (e.g. user started scroll outside the gallery), we exit the function */
                var x = e.pageX; /* The current mouse position */
                var walk = (x - startX); /* The distance moved */
                gallery.scrollLeft = scrollLeft - walk; /* We adjust the scroll position by the distance moved */
            });
            gallery.addEventListener('mouseup', function() {
                /* When the mouse is released, we reset everything */
                startX = null;
                gallery.classList.remove('active');
            });
            gallery.addEventListener('mouseleave', function() {
                /* When the mouse leaves the gallery, we also reset everything */
                startX = null;
                gallery.classList.remove('active');
            });

            /* You can also add event listeners for 'touchstart', 'touchmove', 'touchend' events to handle swipe on mobile devices, in the same way as mouse events. */
        });
    </script>
</head>
Remember to replace "path_to_your_image.jpg" and "description of image" with your actual image paths and descriptions. Try this out and let me know if you need further assistance!

This will result in an output of code by ChatGPT. I’m still learning the best ways to prompt ChatGPT but have found it takes some back and forth to get it right.
You will need to copy the code provided by ChatGPT and paste the code into a text editor on your desktop. I use Sublime Text. Once pasted in the editor, save it to your device.
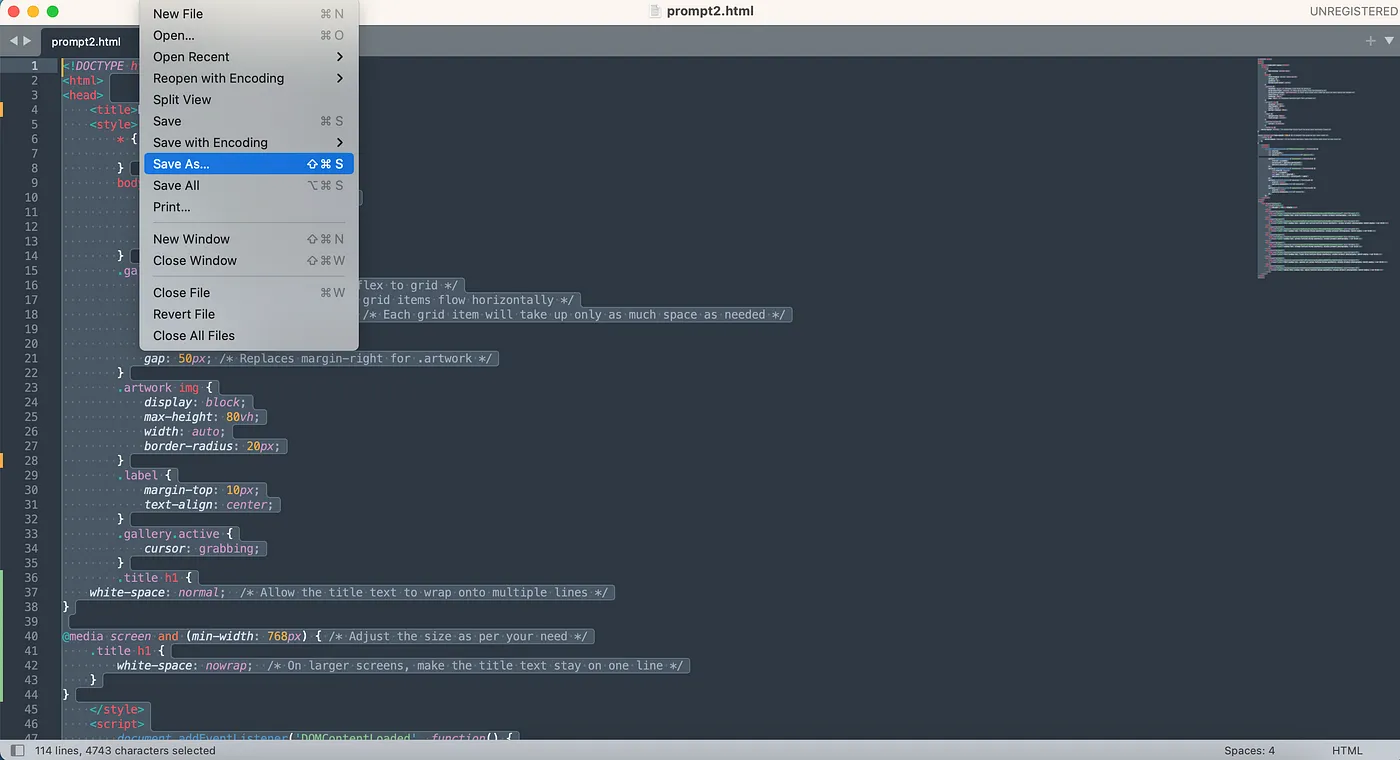
Once saved as an html file, open the file with a browser. It should open in your browser like so:
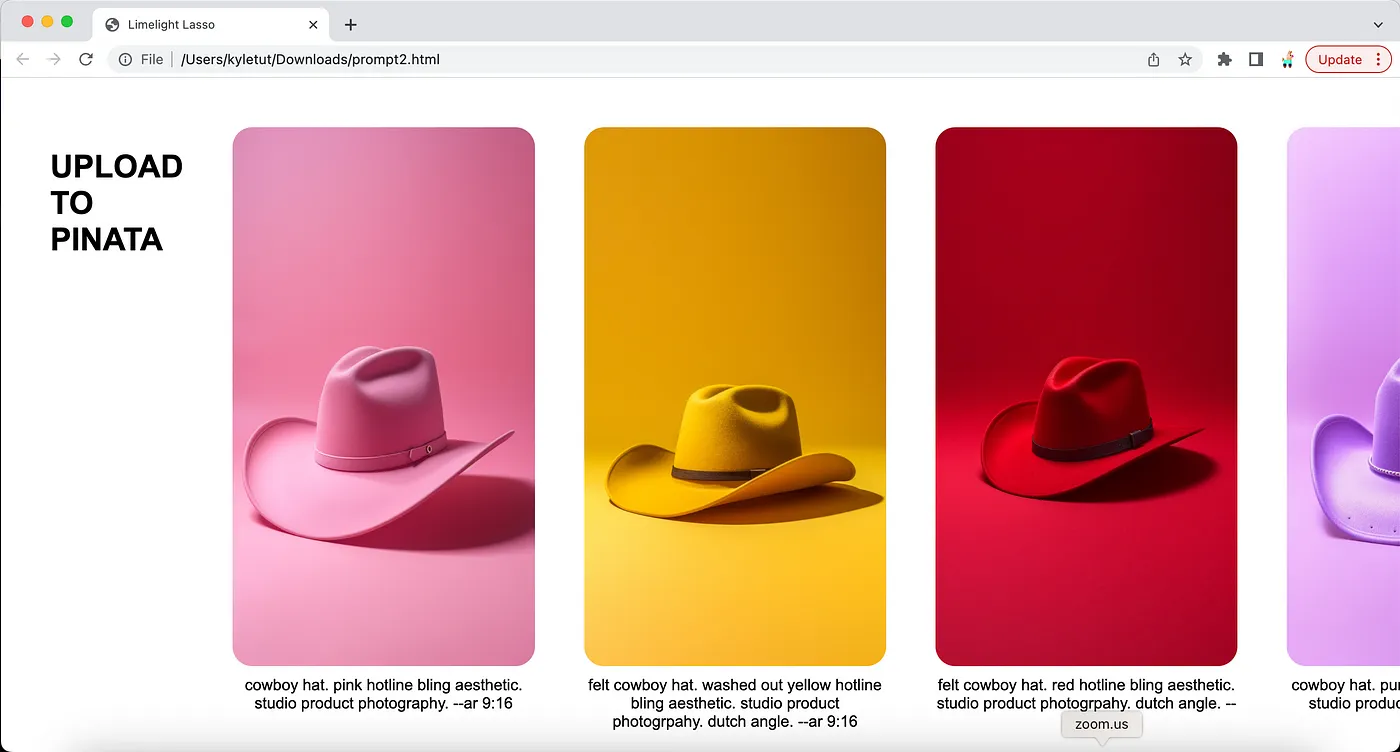
Then, start playing with the functionality. After seeing the initial code in browser, I gave ChatGPT suggestions. You will need to go back and forth a little bit to get exactly what you want. Below are some examples of prompts altering the code:


Once you’re satisfied with the generated code, copy it and save it as an .html file on your device using your text editor. This file will be used in the final section of this tutorial.
If you just want to use the final code produced for this tutorial and make changes to it, see below. The easiest way to do this would be to copy it and paste it into ChatGPT and tell ChatGPT to swap out URLs and make specific changes you desire.
<!DOCTYPE html>
<html>
<head>
    <title>Limelight Lasso</title>
    <style>
        * {
            box-sizing: border-box;
        }
        body {
            font-family: Arial, sans-serif;
            margin: 0;
            padding: 0;
            background-color: white;
        }
        .gallery {
            display: grid; /* Changed from flex to grid */
            grid-auto-flow: column; /* Make grid items flow horizontally */
            grid-auto-columns: min-content; /* Each grid item will take up only as much space as needed */
            overflow-x: auto;
            padding: 50px;
            gap: 50px; /* Replaces margin-right for .artwork */
        }
        .artwork img {
            display: block;
            max-height: 80vh;
            width: auto;
            border-radius: 20px;
        }
        .label {
            margin-top: 10px;
            text-align: center;
        }
        .gallery.active {
            cursor: grabbing;
        }
        .title h1 {
    white-space: normal;  /* Allow the title text to wrap onto multiple lines */
}

@media screen and (min-width: 768px) { /* Adjust the size as per your need */
    .title h1 {
        white-space: nowrap;  /* On larger screens, make the title text stay on one line */
    }
}
    </style>
    <script>
        document.addEventListener('DOMContentLoaded', function() {
            var startX;
            var scrollLeft;
            var gallery = document.querySelector('.gallery');

            gallery.addEventListener('mousedown', function(e) {
                startX = e.pageX;
                scrollLeft = gallery.scrollLeft;
                gallery.classList.add('active');
            });
            gallery.addEventListener('mousemove', function(e) {
                if(!startX) return;
                var x = e.pageX;
                var walk = (x - startX);
                gallery.scrollLeft = scrollLeft - walk;
            });
            gallery.addEventListener('mouseup', function() {
                startX = null;
                gallery.classList.remove('active');
            });
            gallery.addEventListener('mouseleave', function() {
                startX = null;
                gallery.classList.remove('active');
            });
        });
    </script>
</head>
<body>
    <div class="gallery">
        <div class="title">
            <h1>UPLOAD<br>TO<br>PINATA</h1>
        </div>
        <div class="artwork">
            <img src="https://kyletut.com/ipfs/QmVRwiYBPVRN4NcDzA5qpYvkmo3GR5Wh9gHMSsAL7oiwzF" alt="Artwork 1">
            <p class="label">cowboy hat. pink hotline bling aesthetic. studio product photography. --ar 9:16</p>
        </div>
        <div class="artwork">
            <img src="https://kyletut.com/ipfs/QmW6oCTx3eYR7svDDHY8o1TZc1FiMwUWRLCeP3596G9exM" alt="Artwork 2">
            <p class="label">felt cowboy hat. washed out yellow hotline bling aesthetic. studio product photogrpahy. dutch angle. --ar 9:16</p>
        </div>
        <div class="artwork">
            <img src="https://kyletut.com/ipfs/QmeRza4xqPi1XteTkstrVPgtcRZQJ4CQKymDmaN2E89gck" alt="Artwork 3">
            <p class="label">felt cowboy hat. red hotline bling aesthetic. studio product photogrpahy. dutch angle. --ar 9:16</p>
        </div>
        <div class="artwork">
            <img src="https://kyletut.com/ipfs/QmVoRS8p7QzUgSGB6NT3fQp5wWfFENAJxmUPPvLH279Jt8" alt="Artwork 4">
            <p class="label">cowboy hat. purple hotline bling aesthetic. studio product photography. --ar 9:16</p>
        </div>
        <div class="artwork">
            <img src="https://kyletut.com/ipfs/QmaPEFCwTwB5PnL9m3xc3KBgMbQGHjGzTBJvPp6p1noDa7" alt="Artwork 5">
            <p class="label">cowboy hat. orange hotline bling aesthetic. studio product photography. --ar 9:16</p>
        </div>
        <div class="artwork">
            <img src="https://kyletut.com/ipfs/QmeL4UCFQ56D5WFANrBpbq5C6tNFbWnTbB67LL1Vn1z3yz" alt="Artwork 6">
            <p class="label">felt cowboy hat. light blue hotline bling aesthetic. studio product photogrpahy. dutch angle. --ar 9:16</p>
        </div>
        <div class="artwork">
            <img src="https://kyletut.com/ipfs/QmZ7sM5semZhC1vqvK1wSN5zzxHBW3ZJVycTWitYDoANwn" alt="Artwork 7">
            <p class="label">felt cowboy hat. washed out green hotline bling aesthetic. studio product photogrpahy. dutch angle. --ar 9:16</p>
        </div>
        <div class="artwork">
            <img src="https://kyletut.com/ipfs/Qmdv6hnstkUzxDQsZQwoUSL2KH8tN3q9mfNMr9E4nVA3sm" alt="Artwork 8">
            <p class="label">white felt cowboy hat. white hotline bling aesthetic. studio product photogrpahy. dutch angle. --ar 9:16</p>
        </div>
    </div>
</body>
</html>
Upload the Code to Pinata
With the images and webpage ready, we’ll now upload the code to Pinata. Here’s how:
Click on the Add Files button in the upper right and upload the HTML file you created in the previous sections.
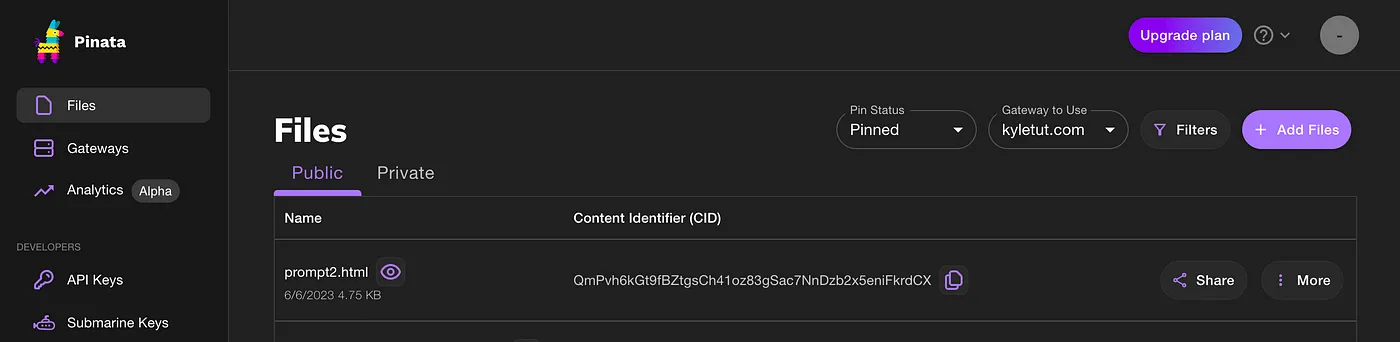
After the upload process completes, Pinata will provide you with a URL for your HTML file.
Visit this URL in any mobile or desktop browser to view your AI-generated Prompt Gallery.
And that’s it! You’ve successfully created a Prompt Gallery using Midjourney, ChatGPT, and Pinata.
Check it out here: https://kyletut.com/ipfs/QmPvh6kGt9fBZtgsCh41oz83gSac7NnDzb2x5eniFkrdCX
🌟Explore our premium plans and start building today!
Happy Pinning!